Pull Comp
Greetings everyone,
Spring has sprung in the Valley of the Sun and things are heating up in Phoenix. I wanted to say a special thank you to all of you that stopped by our booth at the Long Beach ISS Show. I counted 15 of you who came by. We had a fantastic show and looking forward to the East Coast version in Atlantic City, March 17th through 19th. You will find us in booth 524. It has been way too long since we were on the East Coast and I can’t wait to see some of you guys again.

For this months blog I want to discuss a topic we use all of the time at Qdigitizing, Pull Comp. While Pull Comp is not a very sexy topic it is critically important in quality embroidery. If you aren’t a programmer or commercial embroiderer it might not be important to understand all of the technical detail related to Pull Comp but it is really good to have a basic understanding of what Pull Comp is and how it impacts your embroidery projects.
Before anything else is said about Push Pull Compensation (commonly referred to as Pull Comp) it should be understood that Pull Comp should never be used as a crutch for poor programming technique or a panacea to correct all design problems. It doesn’t work that way. Furthermore, it should be understood manually programmed Pull Comp should be used proactively to prevent conditions (like poor design registration) from happening and then Auto Pull Comp Tools should be used to edit for minor design flaws or tweaks to improve overall design appearance.
With all of that said you might be asking, “What is Pull Comp and why is it important?” Pull Comp is the term programmers use to describe techniques used to compensate for the tendencies of fabric to push and pull while being embroidered. Pull Compensation is necessary to offset the tendencies of your fabric to Push Out and/or Pull In depending on the type of stitches being used, how various design elements interact with each other, the fabric being embroidered and any backing solution used. Pull Comp requirements will change if any of these factors (and others) change.
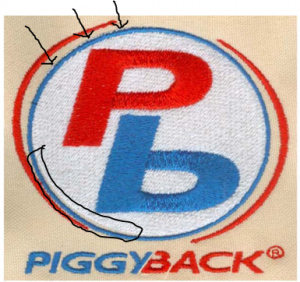
My point is not to overcomplicate the issue but Pull Comp is complicated and understanding why it is important is in a way almost as important as the proper use of Pull Comp. Looking closely at Image 1 you can see two areas where design registration is off. In the area noted black arrows the fill in the design has PUSHED outside the “line” the designer has programmed. In the area circled the stitches have “pulled in.” The result is poor design registration and a design rejected by the customer.
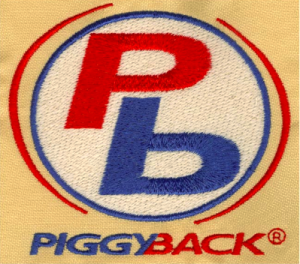
The solution for this problem is pretty easy by using a setting in the software to add width to the blue column that traps the white fill, see Image 2.
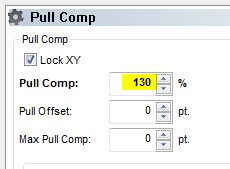
In this case all that was necessary to correct the registration problem was to add 30% Pull Comp(ensation) to the blue border, see Image 3. This change adds 30% additional width to the column allowing the border to better capture the white fill underneath. When using more sophisticated software it is also possible to tell the software to bias the Pull Comp to one side or the other of center. Other more advanced features are also available for the more seasoned programmer.
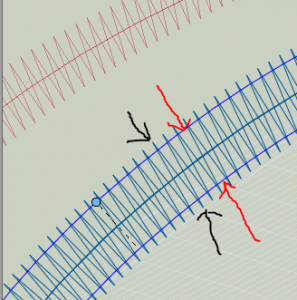
In Image 4 you can see how the software has added “width” to the blue column. The red arrows point to the width the designer originally programmed but as you can see by the black arrows, the software has added column width to either sides of the colum. This extra width is what helps trap the white fill underneath.
What is really important to understand is this correction may or may not be necessary depending on many factors and it is why (in general) programmers do not use Auto Pull Comp tools until they know there is a problem that needs to be corrected. I understand that might seem to contradict what I wrote earlier in regard to using Pull Comp proactively so let me explain further.
All good programmers understand fabric will shift, compress and expand in the embroidery process. Because of this the programmer will (as a function of their experience level) will manually program Pull Compensation in to their designs. For instance, I have noticed that when a logo is sewing on a shirt it tends to PUSH out on the sides and Pull In at the top and bottom. Because of this when I program a design I will “cheat” in so much as (almost without thought) I will program fills to bias OUT for the left and right edges and bias IN for the top and bottom when a border is meant to capture the fill.
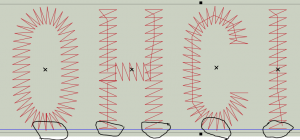
One other area of Pull compensation to consider is a question Programmers often receive, “How come if I look at the letters you digitized some of the letters are taller or shorter than the letter right next to? How come the letters are not all the same size?”
The answer to this is simple, Pull Compensation. The fix and how much fix to apply is somewhat more complex. Applying the right amount of Pull Comp to get all letters to appear the same size on apparel can be very tricky and is dramatically impacted by the fabric you are embroidering on and the type of backing used.
it might be hard to see the Pull Comp but if you zoom in (Image 6) you can clearly see how the programmer has adjusted for the Push and Lull of the fabric. Look closely and you will see how the Straight line letters H and I are slightly above the blue base line and the round letters C and G are slightly below the blue base line. This is 100% intentional and is meant to counter the effect and FACT that Straight letters tend to PUSH out and round letters tend to PULL in. Hence, Pull Comp. It might not seem like a lot, especially because I have zoomed in so tight here but this adjustment is critical to quality embroidery.
Completely understanding Pull Comp is the an area professional programmers spend their careers learning; it is part of the science behind the art of embroidery digitizing. From the non-programmer side of things the most important thing to take away from this conversation is, whenever possible let your programmer know what the design will be embroidered on so they can to the best of their ability manually program the correct amount of pull comp so that if editing is required you or the programmer can use the automated features offered in your software to make quick fixes to adjust for fabric and/or small programming errors.

I had a job that we had Q digitize for us. We had already digitized it ourselves, but thought it could be better. We paid Q to work on on it and had your team try to work out some of the Pull that we were getting. The Q Team never did get us anything that was better. I do not think they had the knowledge about what you speak of in your article. I wish you could go back and see the file that Q did for us. It as last year 2015 and the File as Patterson Logo. Our business is Uniquely Chic.
That was a great article. I have a couple questions. As a general rule should I be leaving the pull comp at 100% as default on my machine (AMAYA XTS). Also is there a standard % I should be increasing for different fabrics? Thank you very much, Michelle
Hi Michelle,
I do not believe in making Pull Comp adjustments at the machine level for one reason. Machine based pull comp adjustments apply the setting to the entire design. WHile that might be beneficial it it may also cause problems. Usually when Pull Comp is needed it is only needed in a specific area of the design, not the entire design. Whenever possible digitizing software should be used at the design level to add pull only where needed in a design. SInce you have the Amaya machine I (believe) you should also have Design Sho software. Your programmer should be providing you with OFM files. Using that software it will always be best to identify the areas that require Pull Comp and apply the setting you feel necessary there.
Steve