How simple shapes can make your complicated design simple
Welcome To Cora’s Corner, where every month I am going to help you with your artwork issues.
This month’s discussion is how simple shapes can make your complicated design simple. Basic shapes like circles and rectangles (with some help from lines) are your best friend. Because it’s the holiday season I thought I would show you how to create some great holiday theme artwork. Although you can use any graphic software program, I used Adobe Illustrator.
The first thing you should consider is using layers to build up your design. This will make it much simpler to select something should you want to change it or move it. Also think of building your design background to front layer or front to background layer. It’s easier to keep track of elements and layers better this way than if you jump around.
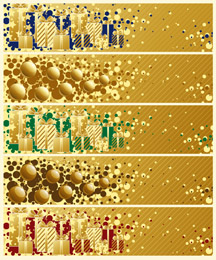
Here is what is on each layer I created for this Holiday image.
Layer 1) Cream color rectangle that covers my whole design.
Layer 2) 5 rectangles with gradient fill of light yellow to brown.
Layer 3) Angled lines with the same gradient fill as layer 2, however the angle has been changed.
Layer 4) Filagree design element one with light yellow to brown gradient that repeats twice. This element is only on the 2nd and 4th rectangle.
Layer 5) Filagree design element two . It has the same gradient fill as layer 4 and it also is only on rectangle 2 and 4.
Layer 6) Light yellow circles of various sizes and scattered around the rectangle. The pattern is the same on all rectangles.
Layer 7) More scattered circles in a different pattern than layer 6. The pattern is the same on all rectangles, however the color is different on each.
Layer 8) Ornaments on rectangle 2 and 4. Create one ornament then copy and paste over left side of rectangle 2. Vary the sizes and placement. Copy and paste to rectangle 4. To make ornament. Create a circle with light yellow to brown fill. Create a crescent moon shape with same gradient fill at a different angle. Use for bottom highlight. Create oval with light yellow to medium brown gradient fill for top highlight. Create white 11 pointed star to top off top highlight. Create a square at the top and behind the circle. Fill with light yellow to brown gradient. On top and behind the square create a medium brown circle outline. This is the top of the ornament that holds the string. Last create the brown string (line) from the top of the outline circle to the top of the rectangle.
Layer 9) Presents in rectangles 1, 3 and 5. First create a rectangle with a white outline. Then create a narrow vertical rectangle with white outline located in the middle of first rectangle. This is the ribbon. Fill with light yellow to medium brown gradient. Create the ribbon bow on top of the box and fill with light yellow to medium brown gradient with white outline. Change angles of the gradient to create highlight and shadows of bow. Copy and paste boxes with bows across the left side of top rectangle. Use various sizes to create variety. Fill some with light yellow to medium brown gradient and the others solid. Fill some with stars and others with stripes. Select all the presents and copy. Paste on
rectangle 3 and 5. Change some of the colors in the presents to matches the scattered circles of each rectangle on layer 7.
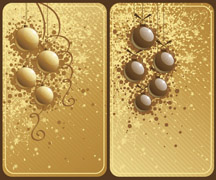
When you are done, you’ve just created wonderful holiday artwork you can use for various projects. Here are a couple more examples created in a similar way.
May you always have food and drink to fill your belly, friends and family to lift your spirits and love to fill your heart. Happy Holidays!
I would also like to hear from you about your most pressing issues about artwork. Your question may be used in a future issue of this newsletter. If you have questions, please email me at cora@qdigitizing.com. And please reference this newsletter.
Looking forward to sharing an exciting journey of discovery into the world of Art.
Sincerely,
Cora Kromer
cora@qdigitizing.com.
Awearness Ink
Step out of the Chaos into the Awearness.


Thanks for the info, I have added a bookmark.